One of the challenges of assembling your own effect pedals is not necessarily on the electronics side of things. Sourcing the parts and assembling them do have their caveats and costs, but drilling the enclosures can present its fair share of troubles. Not everyone will have all the required bits and bobs necessary to drill holes in an aluminium box, and it .
In the last few months, I did a few projects where I was required to drill my own stomp boxes. In this post, I'll discuss the setup I started with, the one I'm currently using, the equipment you'll need and one or two ways to drill the holes in your enclosures.
Equipment you'll need
As mentioned in the introduction, you may not have all the equipment required to drill holes in something that is not drywall or wood studs. Aluminium, although a relatively soft metal, requires metal drill bits, preferably hardened or titanium-coated for longer life-span.
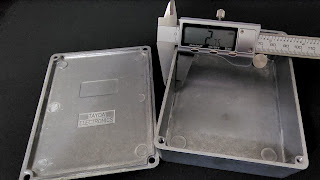
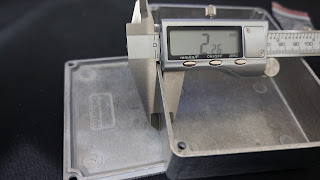
The typical effect pedal enclosures are Hammond (or Hammond clones) 1590-series, of which the 1590B and 1590BB are the most popular. The average aluminium thickness measured with my trusty digital caliper is between 2.26mm for Hammond name-brand and 2.75mm for Tayda Electronics house-brand.
 |
| Tayde Electronics boxes: 2.75mm thick |
 |
| Hammond Manufacturing boxes: 2.26mm thick |
With that in mind, almost any metal drill bit would do. I suggest you stick with the name-brands like DeWalt, Irwin, Milwaukee, or even Ryobi since the Chinesium drill bits you can get for cheap on Amazon will get dull after a few uses. I'm using a Ryobi titanium-coated drill bit set that I got for 10$ on sale at Home Depot. They work perfectly, and if one breaks or gets dull it doesn't break the bank to get another set.
As for the drill, any drill will work. I suggest a corded drill because they won't run out of battery when you are halfway in the aluminium and they are often slightly more powerful than cordless ones. If you happen to own an expensive professional-grade cordless drill, that's another story and you should be fine. I use a cheap DeWalt corded drill that I bought on sale at Canadian Tire five or six years ago.
Securing the enclosure for drilling
In a perfect world, you would be using a drill press with a proper vise-grip base to hold the enclosure in place. However, drill presses are big, heavy, and expensive. The cheapest I found while shopping is a Ryobi branded one for 150$ at Home Depot, but it's still a huge piece of equipment that I can't really fit in an apartment. I suppose it's also louder than a bog-standard drill, and my neighbours might not appreciate me running that for extended periods of time...
Custom-made jig
Since a drill press is out of the question, I originally made a jig out of a plank of wood, some dowels, and some nails. Nails can be removed to adjust the spacing of the dowels to accommodate different enclosures or orientation. It works fine, but it's not super solid. It was never intended to be a long-term solution either. It Does The Job™, but barely just. If things vibrate too much, the enclosure can come loose and start spinning which can lead to unfortunate outcomes and possibly bloodshed. You most likely want to prevent bloodshed when power tools are involved. Since this setup is problematic at the best of times, I stopped using it.
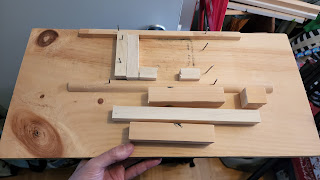 |
| It's ugly, but it works. |
Work bench and portable work bench
The next best thing you can use to secure what you need to drill is a work bench (or a portable one). I currently use a portable work bench (a Black & Decker Workmate) with an adjustable surface and swivel grip pegs. I can place dowels between the pegs to create a larger clamping surface and retain some support on the edges while still being able to open the work bench surface so the drill bit doesn't hit the work bench if it goes too deep. It's a lot more stable and easy to reorient the part I'm drilling than the jig I previously rigged up. The risks for the part to start spinning uncontrollably are slim, unless a swivel peg or a dowel break.
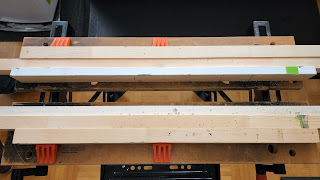 |
| Much sturdier than the drilling jig, the portable work bench is also easier to adjust. |
Drilling method
If you have a ½-inch hole to drill, you can't really take your ½-inch drill bit and go at it willy-nilly, even if you have very steady hands. Well, you can - if you have a drill press, top-quality drill bits, and a good vise-grip support. If you don't have these, don't even try. You may end up breaking either the enclosure or the drill bit (and again, risking bloodshed, staining your clothes, messing up the room, and making your husband/wife/roommate angry).
You have to start small and gradually widen the pilot hole with larger bits. I usually start with a 5/32-inch inch pilot hole, after which I go through every bits of my set until I reach the size I need.
One important thing is to use lubrication, either cutting oil or multi-purpose machine oil. Since it's not high-speed milling or hardened metal, the cheap 3-in-1 multi-purpose oil is good enough to prevent the metal and the drill bit to overheat and to keep the friction at a minimum. It will also help to minimize the amount of metal shards flying around as you drill.
Caveat: size does matter
The size of your drill chuck and drill bits, that is. Most drills available on the market have a 3/8-inch chuck, meaning the largest drill bit shank you can use is 3/8-inch. Drill bits are usually available with a 3/8-inch shank for up to ½-inch of actual drill bit size. Anything larger than that (say ¾-inch) will be more readily available with a ½-inch shank. Adapters exist and you can always change the chuck on your drill, but it will most likely cost you more than the cost of the actual drill. Professional-grade drills and drill presses often have ½-inch chucks, so it's not typically a problem with tools in that range.
Certainly there's something faster that going through 15 drill bits, right?
Yes. It's a step drill bit and it's wonderful. You still need a pilot hole, somewhere 5/32-inch, but after that you can use the step drill bit to drill the holes to the required size in more or less one go. A good step drill bit is around 50$ to 60$ at your local hardware store, depending on the size and what it's rated for. Stay away from the Chinesium ones you'll find for 10$ on Amazon. They are basically one-use bits where the edges will become blunt and possibly break with the first use. I tried it for you so you don't have to. 0/10, do not recommend, even with rice.
I use a Milwaukee #4 SHOCKWAVE 3/16-inch to 7/8-inch, titanium-coated and impact-rated step drill bit. Most hardware stores carry them with a price tag between 60$ and 65$. It is rated for mild steel, which is a lot harder than aluminium and is more than enough for my needs. I used it to drill four enclosures so far, and it's holding up perfectly.
 |
| Buy the branded one. Skip the no-name one. |
Caveat: it's chamfered!
Most step drill bits will leave a chamfered edge around the hole. You may need to use washers to tighten parts, or purchase slightly larger ones if the provided washers are too thin. If you are drilling holes relatively close to each other, it's one more thing to consider to not end up with overlapping washers and wonky installed parts.
Summary
You don't need a lot of equipment to drill holes in an aluminium box, but it needs to be adequate for metal:
- A good drill;
- Metal drill bit set;
- Good quality step drill bit, rated for metal (optional, but makes things much easier);
- A work bench or a sturdy drilling jig (and something to clamp it into).
If you have a work bench I suggest you use it to clamp things down so nothing moves, but you may as well make your own sturdy drilling jig (unlike mine, which wasn't made to be used more than once or twice). You'll still need to clamp the drilling jig down to something, and the kitchen table might not be the best place for it...


Comments
Post a Comment