STM32 Development: Configuring Arduino IDE/Visual Studio to build and deploy to STM32-based boards

As a follow-up to my previous post, where I talked about using Visual Studio for Arduino development, this post will be providing an abridge guide to set it up correctly with Visual Micro's Arduino IDE for Visual Studio extension. There will also be a configuration guide to enable STM32 build and deployment.
Prerequisites steps
You NEED to have Arduino IDE (from arduino.cc) installed on your computer for full compatibility. The Windows Store App version is not supported by Visual Micro.
Visual studio configuration
- Download Visual Studio Community Edition from Microsoft's website.
- Download Visual Micro's Arduino IDE for Visual Studio extension from either Visual Micro's website or Visual Studio Marketplace
- https://marketplace.visualstudio.com/items?itemName=VisualMicro.ArduinoIDEforVisualStudio
- https://www.visualmicro.com/page/Arduino-Visual-Studio-Downloads.aspx
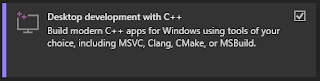
- Launch the installer and follow the prompts. When asked which components to install, make sure the Desktop Development with C++ component is selected.
- Complete the installation process, and launch Visual Studio at least once to complete the initial setup process.
- Make sure Visual Studio is closed, and launch the extension installer. Should any required component be missing, you will be prompted to download and install them.
- Once the installation is complete, launch Visual Studio. The extension should pop a configuration window after a few seconds.
- Select the version of Arduino IDE you installed and make sure the paths are correct.

- You should now have access to new Arduino project types. These project types will give you access to new toolbars with similar options present in the original Arduino IDE.
- Make sure you select the correct source IDE, board type, and board part number before compiling and uploading your code.


Add STM32 boards support to Arduino
Download and install STM32CubeProgrammer from STMicroelectronics. You will need to provide your email in order to get the download link.
Once this is done, we now need to add the boards to both Arduino IDE and Arduino IDE for Visual Studio. The steps are similar.
Arduino IDE
- Start Arduino IDE, and go to File->Preferences.
- In Additional board manager URLs, add the following URL and click OK: https://github.com/stm32duino/BoardManagerFiles/raw/main/package_stmicroelectronics_index.json

- Restart Arduino IDE, then go to the Board Manager.
- In the search field, type stm32, then install the STM32 MCU based boards by STMicroelectronics.

- Close Arduino IDE. Don't try to deploy to your device with it, it will not work due to some bugs in Arduino IDE preventing upload if no ports are specified.


Visual Studio - Visual Micro Arduino IDE for Visual Studio
- In the vMicro toolbar, select General->Configure Arduino IDE Location(s)

- Select your Arduino IDE version, then add the following URL in the Optional additional board manager urls field: https://github.com/stm32duino/BoardManagerFiles/raw/main/package_stmicroelectronics_index.json
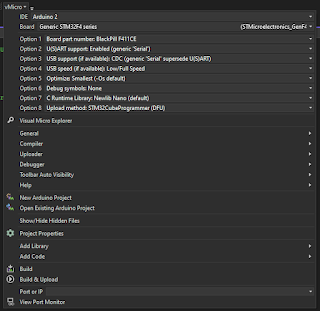
- In the vMicro toobar, select Visual Micro Explorer.
- In the tool window that opened, select Boards manager, and type stm32 in the search field. Install the STM32 MCU based boards package by clicking on it. (It's greyed out in the screenshot since it's already installed on my environment.)

- Once installed, configure the board settings and options. I used the following:


- IDE: Arduino 2
- Board: Generic STM32F4 series
- Option 1: Board part number: Black Pill F411CE
- Option 2: U(S)ART support: Enabled (generic "Serial")
- Option 3: USB support (if available): CDC (generic "Serial supersede U(S)ART)
- Option 4: USB speed (if available): Low/Full speed
- Option 5: Optimize Smallest (-Os default)
- Option 6: Debug symbols: None
- Option 7: C Runtime Library: NewLib Nano (default)
- Option 8: Upload method: STM32CubeProgrammer (DFU)
Uploading your program to your STM32 device
In order to upload your compiled program to the STM32, the device needs to be in DFU mode (Device Firmware Upgrade). On devices using an STM32F411CEU6 microcontroller (with 2 physical buttons), follow these steps to enable it. Once the deployment is complete, the device will reset and go back to standard operation mode.
- Connect the USB cable to the device.
- Once powered on:
- Press and hold the BOOT button.
- Press and release the NRST button.
- Release the BOOT button.
- The device should now be in DFU mode.
Caveat: DFU mode on STM32 devices is, oddly enough, temperature-sensitive. The device should be at room temperature in order for the DFU mode to activate. If Windows complains about an unrecognized peripheral when performing these steps, wait a minute or two and try again.


Comments
Post a Comment